Tuesday, May 14, 2024

Welding in Silhouette Studio Beyond Fonts

 Welding


Increasing your skills with the welding tool in Silhouette Studio increases your ability to personalize your handmade cards. This lesson brings to you a simple combine 'weld' of two separate files both downloaded through The Silhouette Design Store.


You can watch the YouTube video here.


Let's start with the basics necessary for this lesson.
  • On the top we see the complete card size and the z-fold sections because we need those for reference when we combine the crown to the donut.
  • Next on the bottom of the screen we have the front of the Z-fold with the donut.
  • On the left side we have all layers of the donut so we can check the complete layout.
  • Also to the left we have the crown scaled pretty close to needed size.


By combining the layers of our donut and placing the front layer over our base layer we see exactly how our pieces will be glued together after cutting.
Now we are ready to make modifications.


For complete details remember you can watch the video here.

When the crown is where you want it on the design you'll choose your offset panel and select offset, I chose .050 as this is big enough to include the little bits of the crown and still stay within my card base perimeters. 


Then you will choose your crown outline hold your shift key and select your bottom donut and right click and select weld. Make sure you then select group to save your fold lines.

These are the basic steps to most personalization on your handmade cards, or cake top shakers in your Silhouette Studio Software.

Thanks for stopping by the TweakingCorner and we hope to continue to bring you short quick lessons you can use on whatever your project is on your workspace. Happy Tweaking!

Thursday, May 9, 2024

Create Score Lines with Embossing Tool on the Cameo 5

 How to Create Score Lines on the Silhouette Cameo 5

Today's inspiration comes from Lisa Curcio of Lisa's Stamp Studio. I recreated her pleated paper card template by taking a screenshot of her pdf and importing it into my Silhouette Design Studio to access as I was creating. In this lesson I am focusing on how to create those score lines, but this is a peek how I saved the completed file to my Silhouette Library for easy cut access later.


I encourage you to check out Lisa's Stamp Studio for more inspiring card ideas and helpful templates to streamline your card making process. Her content is perfect for both beginning and experienced card makers alike.

Watch my YouTube video to see how to create score lines in Silhouette Studio and sending them to the Cameo 5 with the Cutting Blade and Embossing Tool.

I am so excited for you to increase your Silhouette and card making skills, using paper and graphics or stamps you have on hand. (or order some from Lisa) Happy Tweaking!


Supplies used in this video: (I earn a small commission on some of the items below at no additional cost to you)


12x12 Scrapbooking Paper Similar to this

Check out my more extensive list of my Favorite Craft Supplies here.


Monday, April 1, 2024

Stencils on the Silhouette Cameo

 Stencils Made Easy 

Simply put stencils are tools used to create repeated designs or patterns on surfaces such as walls, paper, fabric, or other materials. They are typically made of thin, flexible materials like paper, plastic, cardboard or metal. Stencils consist of a pattern or design with cut-out sections, allowing paint or ink to be applied through these openings onto the surface below.

Before my silhouette cameo I didn't put much thought into stencils, I either liked them or I didn't. I used them for a project or I did not think they were right for what I was trying to accomplish.

Then came the Silhouette Cameo where all things were possible it was just a matter of how.

The most important lessons I can teach you for stencils is to remember it has to be inside a solid shape, a box or rectangle if you will. 

For instance if you want to put your street number on a sign or curbside. Let's say your address is 1034 you must add a box around it. Example 1.

Example 1
The next crucial bit of knowledge I can pass along all bit must be attached. In our above example the center of the 0 and the center of the 4 have no attachment to the rest. Stencil 1.
Stencil 1
In some instances this is a fun look and can be incorporated into the design, but for this example, we want those center pieces attached.

This can be accomplished by drawing a small rounded rectangle for each piece we need to attach.
placing it across a straight section on an angle within the area.

Placing connecter rectangles

First make your number and your rectangle a compound path. Then highlight or select all of your items and weld. Now your stencil has no island pieces. 


Completed Stencil

Watch the YouTube video here


A few extra tips:

Start light, doesn't matter if it's spray paint, acrylic paint, or ink blending. Better to do multiple light coats than to have your paint or ink bleed under the stencil.

If you do not want it to look like you used a stencil to paint you can use a thin paint brush to go back over your work and fine line in the missing pieces. 

Another video about stencils is available over on our TikTok 


Recommended products to make address stenciling successful. By using our affiliate link we get a small percentage of the sale at no additional cost to you.  110lb Cardstock Blue Painter's Tape 


Check out our complete affiliate list link to see our other favorite products. https://www.tweakingcorner.com/our-favorite-products/craft-supplies-and-tools


Sunday, February 18, 2024

Outlines or Offset Made Easy

Outlines or Offsets Made Easy

Outlines can make words look more interesting, creating depth, extra color, or bling. Outlines can also help words stand out from what is behind them. Last but not least: outlines help physically keep letters together on a surface.

No matter the end goal, the process is very similar and very simple in Silhouette Studio.


In this example we will outline complete text.

  1. Find your favorite font and type your name or word.
  2.  Select your word and then select your offset panel.  When creating cards or Shaker Cake Toppers .10-.15 is typically a good border with rounded corners.
  3. Now you can pull your text out of the offset shape, and prepare to cut from desired material.
  4. If your shape has bits inside the shape, you will want to right click and release compound path. Delete unnecessary bits.


In this example we will outline individual letters.

  1. Find your favorite font and type your name, number or word.
  2.  Select your text and right click, select ungroup. Your word is now individual letters.
  3. Space letters apart to allow space for outline.
  4. Select all your letters, select offset panel. .10-.15, rounded corners, and apply.
  5. Now you can pull your letters out of the offset shape, and prepare to cut from desired material. 

This example is from my Gift Bag Upscale Tweak


Wednesday, January 17, 2024

Stamping Multiples

 Valentine Multiples Made Easy

When my kids were little over 30 years ago we would get that class list and create some very basic valentine cards and attach the simple sticker or tootsie roll. 

Then my granddaughter would spend Fridays crafting with Grannie. We would work for several Fridays completing special gifts for each class mate,  office staff, and any teachers that had a special place in her heart. 

I love to create in multiples. These days I'm just creating cards. But still I create a bunch. So anytime I can simplify the process it makes it more fun. And if you follow me in other places it saves me 'spoons'.

Today's process is stamping in multiples. 

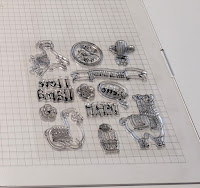
I take the whole stamp set,  mount it with tape or double sided sticky to the clear plate of my MISTI stamping tool.

If the stamps are too close together to create a border around them I move them around slightly. 


Mount Stamp Set to MISTI 

Stamp entire set on white cardstock.

Stamp on white cardstock

Place stamped sheet on your Silhouette PixScan Mat.

Place on PixScan Mat

I use my Cannon camera to take a picture, you can use your cell phone, a scanner, this is just what works for me. 


Take a picture of your PixScan Mat

Now I remove the media card and insert in my laptop. And pull the image into my PixScan Silhouette software. 

After scanning all the images I create a small outline for each image. Making a few tweaks to individual images if necessary. 

After completing outlines all inner lines can be deleted. 

For your first cut you can literally cut out your images on your PixScan Mat.

Now you have master outline files.  I setup a many as I can on a page,  then cut them in half to Stamp them. 

2 sets 'die cuts' ready to stamp


Cut out your basic 'die cuts'. Save the scrap for your layout. Then insert your 'die cuts' into matching holes. 

Insert 'die cuts'


Now you can Stamp all the images at the same time. 

Stamp 'die cuts'


Ready for assembly 

Subscribe and follow to see to more tweaks and to see this finished project. 


Thursday, January 4, 2024

A2 Organizers for Scrap Papers

I love a quick Silhouette Cameo Tweak that solves multiple issues. 

These A2 magazine style organizers from Lori Whitlock are perfect.

I changed the labels to the opposite side of the box for easy read ability and so I can see the paper from my work space. (The opposite of how they would normally be positioned) 

I created the boxes from heavy 100lb cardstock. With light weight paper for insert panels adding durability and fun design. (It's all in Lori's download file.

Perfect to organize paper scraps, and keep frequently used items within easy reach.


Because I like to get right to the story,  I'll add the extras here...

Utilizing Paper Scraps

Papercrafting now, just over 12 years, (Tweaking for a lifetime, lol) I quickly discovered scraps are a real issue.  


My first efforts to save all those great useable pieces, I read to cut to the nearest inch and store with like colors.  Some recommendations were folders, clear sleeves, paper totes, etc you get the idea. 

Well,  it was rather tedious to keep up on it and cumbersome to access. 

Then I started traveling a little and making cards in my motorhome. Utilizing the Cricut Joy (sorry for crossing platform 😬) for small cuts if I needed them. 

Before I headed out I would grab a stack of prefolded and logo stamped bases in assorted colors.  And a stack of precut assorted color mats 4X5.25 and white fronts at 3.75x5.00.


It was pretty quick when I realize any shape I needed could be put on that little Cricut Joy mat in that 4X5.25 size.  In fact I could cut the shape from the middle and still utilize it as a photo mat.💡

That's when I started cutting all my scraps first to 4X5.25 and any light colored or white 3.75x5.00.
(Smaller pieces to the nearest inch,  but more on that later) 

Then I was able to quickly tote these with me while traveling. 

Back home I found myself reaching for those pre-prepped traveling supplies. 

I grabbed a couple non used clear boxes and stacked card bases in them. I found a couple drawers that had empty space I could fill. 😲


There I was assembling cards,  but it was so much easier when I was in the motorhome.  Now if that isn't completely backwards from reality. 

So as the New Year approached I knew this had to be my everday annoyance with a simple solution. 

Quick fix, big impact! 


And back to those other smaller scraps.  I still put them in folders in my drawer right below me. If I need to cut an Easter egg, a sock,  or matting for a sentiment, I simply open that drawer find the color folder and grab a little piece and throw it on my Silhouette mat.


Saturday, December 17, 2016

Silhouette Mint Ink Storage

No better 'Tweak' than a useful Tweak


I recently added the Silhouette Mint to my Silhouette collection. I've never been much of a stamper, so this little addition to the tweaking corner has taken a small niche of it's own. 
Like all of my new additions I find the need to organize it. First was those tiny bottles of ink. I scored the perfect cabinet at the local thrift store, but quickly found all those bottles were toppling over when I reached for one... 
With the silhouette I make boxes all the time, but I thought maybe I can tweak what I already have.

This was a super quick tweak and no more falling over bottles!


Grab all those little boxes the ink arrived in, and your hot glue.


Cut off the hanging tag, then cut your box down the middle. As pictured above.


Add hot glue and fold in. Make sure to use very little glue and press in tight to reduce extra sizing. 


You can see I didn't take the time to make my cuts perfect, just grabbed scissors and went for it. 


Well worth the few minutes to complete!

 TweakingCorner.com