Showing posts with label silhouette cameo. Show all posts

Thursday, May 9, 2024

Create Score Lines with Embossing Tool on the Cameo 5

 How to Create Score Lines on the Silhouette Cameo 5

Today's inspiration comes from Lisa Curcio of Lisa's Stamp Studio. I recreated her pleated paper card template by taking a screenshot of her pdf and importing it into my Silhouette Design Studio to access as I was creating. In this lesson I am focusing on how to create those score lines, but this is a peek how I saved the completed file to my Silhouette Library for easy cut access later.


I encourage you to check out Lisa's Stamp Studio for more inspiring card ideas and helpful templates to streamline your card making process. Her content is perfect for both beginning and experienced card makers alike.

Watch my YouTube video to see how to create score lines in Silhouette Studio and sending them to the Cameo 5 with the Cutting Blade and Embossing Tool.

I am so excited for you to increase your Silhouette and card making skills, using paper and graphics or stamps you have on hand. (or order some from Lisa) Happy Tweaking!


Supplies used in this video: (I earn a small commission on some of the items below at no additional cost to you)


12x12 Scrapbooking Paper Similar to this

Check out my more extensive list of my Favorite Craft Supplies here.


Monday, April 1, 2024

Stencils on the Silhouette Cameo

 Stencils Made Easy 

Simply put stencils are tools used to create repeated designs or patterns on surfaces such as walls, paper, fabric, or other materials. They are typically made of thin, flexible materials like paper, plastic, cardboard or metal. Stencils consist of a pattern or design with cut-out sections, allowing paint or ink to be applied through these openings onto the surface below.

Before my silhouette cameo I didn't put much thought into stencils, I either liked them or I didn't. I used them for a project or I did not think they were right for what I was trying to accomplish.

Then came the Silhouette Cameo where all things were possible it was just a matter of how.

The most important lessons I can teach you for stencils is to remember it has to be inside a solid shape, a box or rectangle if you will. 

For instance if you want to put your street number on a sign or curbside. Let's say your address is 1034 you must add a box around it. Example 1.

Example 1
The next crucial bit of knowledge I can pass along all bit must be attached. In our above example the center of the 0 and the center of the 4 have no attachment to the rest. Stencil 1.
Stencil 1
In some instances this is a fun look and can be incorporated into the design, but for this example, we want those center pieces attached.

This can be accomplished by drawing a small rounded rectangle for each piece we need to attach.
placing it across a straight section on an angle within the area.

Placing connecter rectangles

First make your number and your rectangle a compound path. Then highlight or select all of your items and weld. Now your stencil has no island pieces. 


Completed Stencil

Watch the YouTube video here


A few extra tips:

Start light, doesn't matter if it's spray paint, acrylic paint, or ink blending. Better to do multiple light coats than to have your paint or ink bleed under the stencil.

If you do not want it to look like you used a stencil to paint you can use a thin paint brush to go back over your work and fine line in the missing pieces. 

Another video about stencils is available over on our TikTok 


Recommended products to make address stenciling successful. By using our affiliate link we get a small percentage of the sale at no additional cost to you.  110lb Cardstock Blue Painter's Tape 


Check out our complete affiliate list link to see our other favorite products. https://www.tweakingcorner.com/our-favorite-products/craft-supplies-and-tools


Sunday, February 18, 2024

Outlines or Offset Made Easy

Outlines or Offsets Made Easy

Outlines can make words look more interesting, creating depth, extra color, or bling. Outlines can also help words stand out from what is behind them. Last but not least: outlines help physically keep letters together on a surface.

No matter the end goal, the process is very similar and very simple in Silhouette Studio.


In this example we will outline complete text.

  1. Find your favorite font and type your name or word.
  2.  Select your word and then select your offset panel.  When creating cards or Shaker Cake Toppers .10-.15 is typically a good border with rounded corners.
  3. Now you can pull your text out of the offset shape, and prepare to cut from desired material.
  4. If your shape has bits inside the shape, you will want to right click and release compound path. Delete unnecessary bits.


In this example we will outline individual letters.

  1. Find your favorite font and type your name, number or word.
  2.  Select your text and right click, select ungroup. Your word is now individual letters.
  3. Space letters apart to allow space for outline.
  4. Select all your letters, select offset panel. .10-.15, rounded corners, and apply.
  5. Now you can pull your letters out of the offset shape, and prepare to cut from desired material. 

This example is from my Gift Bag Upscale Tweak


Saturday, December 17, 2016

Silhouette Mint Ink Storage

No better 'Tweak' than a useful Tweak


I recently added the Silhouette Mint to my Silhouette collection. I've never been much of a stamper, so this little addition to the tweaking corner has taken a small niche of it's own. 
Like all of my new additions I find the need to organize it. First was those tiny bottles of ink. I scored the perfect cabinet at the local thrift store, but quickly found all those bottles were toppling over when I reached for one... 
With the silhouette I make boxes all the time, but I thought maybe I can tweak what I already have.

This was a super quick tweak and no more falling over bottles!


Grab all those little boxes the ink arrived in, and your hot glue.


Cut off the hanging tag, then cut your box down the middle. As pictured above.


Add hot glue and fold in. Make sure to use very little glue and press in tight to reduce extra sizing. 


You can see I didn't take the time to make my cuts perfect, just grabbed scissors and went for it. 


Well worth the few minutes to complete!

 TweakingCorner.com

Monday, March 7, 2016

Wedding Banners made Easy

Making Multiples Easier

Banners are one of those projects that compel a sort of similarity. If it's a long banner it necessitates similarity if you are to complete it in a timely manner.
 
Today I wanted to share a few life tweaks that make them even easier. Starting with when I recently redid my craft room the one change I made I do not know how I ever lived without was adding a ruler to the edge of my frequently used surface.


Wednesday, February 10, 2016

Easy Chalkboard File Folder Labels

Do Less With More Focus

Sometime it seems we try to do these amazing things, when in fact we could focus a little more and achieve greater outcome. This weeks organization project was just that.
 
I needed file folders I could put a description or client name on the top of with a date when necessary. I wanted to re-use these folders but I still wanted them to look great.
Chalkboard is the hottest label right now, I cut these fancy labels for things all the time.
 
Why not on folders too?
 
Chalkboard File Folder Labels cut on the Silhouette

 
here's the tweak
 
 
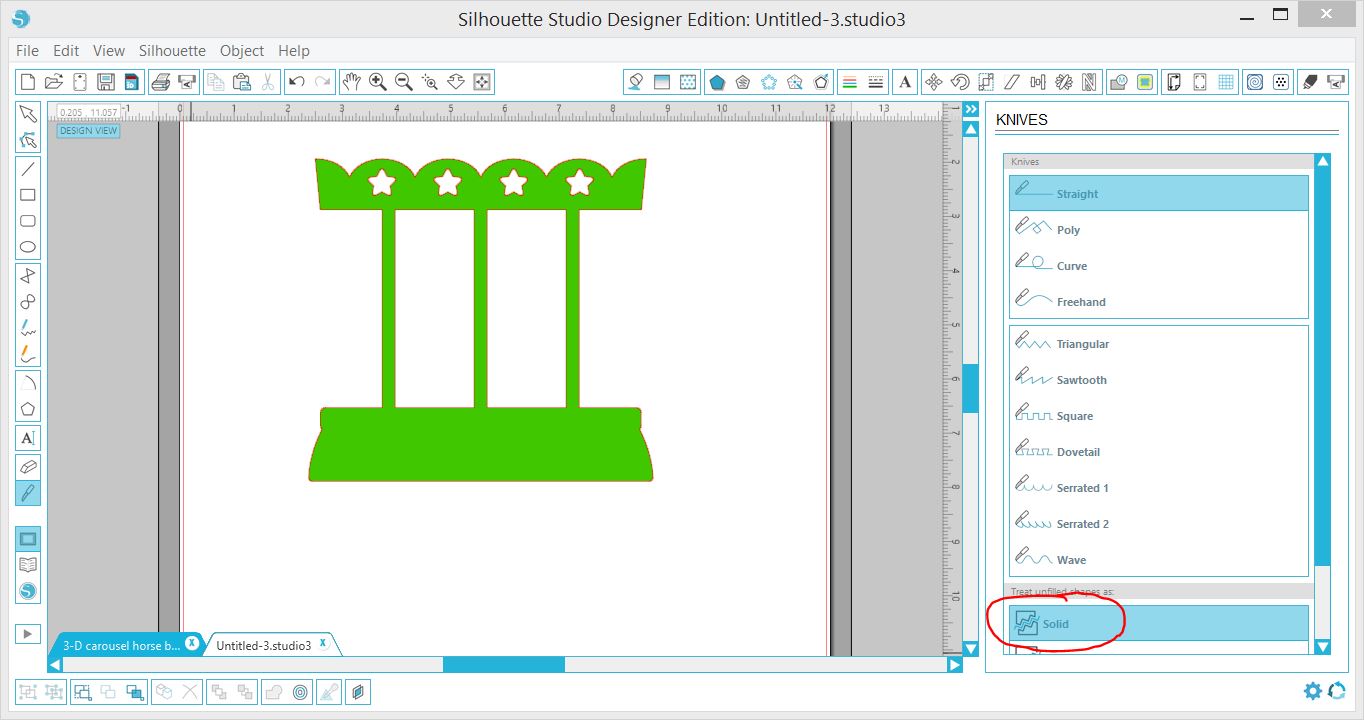
  1. Draw a rectangle shape with rounded corners to fit your tab. (red circle) I created these 3.5 inches wide by 1/2 inch tall.
  2. Then use your cut tool, (blue circle) to cut off bottom edge to make shape flat on bottom. Make sure your unfilled shape is toggled to treat as solid.


Once shape is completed replicate as many times as needed.
 
That's it doing less with more focus! Happy Tweaking!
 

Wednesday, January 20, 2016

Weekly Free Download

Silhouette Free Download 1/19/2016

 
For those new silhouette users every week the Silhouette store offers a FREE download pattern.
Sometimes the patterns may not appeal to you as much as others, but especially in the beginning I recommend always downloading them. It will make you familiar with different design ideas, and most pieces can be used in lots of different ways.
 
First let me give credit here to Daniela Moscone she is the amazing designer for this one. I was most surprised by this card because the back flaps double as the cards stand. So this one stands up on it's own. We love that!
 
Then to add just a quick enhancement to the back-side I saved the stars and the rectangles from the front cut. I also used my cutting tool to cut an additional base.
 
1. Duplicate your base. (or copy paste)
2. Select your Cutting Tool
 

3. Make sure your unfilled shape stays as a solid.
4. Hold your shift key while dragging knife across bottom section to cut in straight line.
NOTE: If your new to the knife remember that if you cut a little off simply hit your undo and start again until you get it straight.
Now you have the base and you can delete the upper half. :)
Happy Tweaking...


Saturday, September 13, 2014

Headboard Personalization

A special gift for my Hubby

Previously I posted spice jar labels and that I had a second project in mind for these leaves by Loni Harris. Second Project complete.
 
Head board in our RV, an Everlite by Evergreen.
 
Original post with spice jar project.

Sunday, April 6, 2014

Hoppy Easter Gift Box Set and Card

New Life

 
With Spring emerges new life. Often we overlook the fact new life comes from previous existence. Bits and pieces of our every day life are somehow connected to our past. Each choice we make today was made possible because of previous happenings or experiences.
Weather we have pushed through some bad spots, clung to an array of fabulous moments, or simply walked through a season of  little or no variables. We take with us those very things. As a few of you know I have had several seasons of challenges.
I have chosen to take the good bits and pieces which ultimately mean the most and move forward. I was blessed with a very creative Mother, and a Father who worked hard to support us no matter what creative choices of lifestyle my mother chose (building a log cabin, owning our own businesses, raising our own food, etc). I was blessed with a set of Grandparents who prayed for me as well as a Grandparents that spent time with me. As my husband and I began our very young lives together I was blessed again with a very dear friend that spent much time, prayer and giving of herself that Thom and I would have success in our lives together.
 
   So todays Tweak using my Silhouette Cameo brings new life to 7 SVGCuts Kits. Symbolizing small bits and pieces can produce a fabulous new creation.

 "Hoppy Easter"

 
A few hints to do the tweak

Saturday, April 5, 2014

Music Speaks

Music Speaks where words Fail


I think no matter where you find yourself in life this could speak to you. The teenager in his/her room with the music blasting because no one understands them. Maybe you are the young married couple standing singing along in worship Sunday morning where seemingly nothing has gone right between the two of you all week, but as you worship walls are dropped and healing begins. The daily commuter that gets inspiration from travel music. Perhaps your laying in a hospital bed knowing your time served on earth is about to end, or perhaps your the person standing at the side of the bed knowing your loved one is about to leave you. So much of our lives are touched by music.

Music speaks where words fail.


http://silhouettetweaking.blogspot.com/p/layered-picture-frame-matting.html
Do the Tweak


Sunday, March 16, 2014

Personalized Gift Bags and Tissue Paper

Be Strong in The Lord

Personalized Gifting

 
I love themes! The simplest gift becomes a master piece with just a little extra tweaking.
 
The current tweak includes:
  • personalized tissue paper
  • personalized gift bag
  • personalized gift
A few simple steps and you will be tweaking a simple gift into extraordinary!

Do The Tweak!
DO THE TWEAK!


Sunday, December 8, 2013

May your tree reflect the true meaning of Christmas this Holiday Season

Re-purposed Wood Christmas Tree
 
 
Repurposed fence boards worked perfectly for this project.
This tree measures 5ft wide on the bottom board and approx. 5ft from top to bottom.
 
Make the Tree